Friday, 2 August 2013

HOW TO MAKE AN AUTOMATIC STREET LIGHT USING 555 TIMER IC

Hi friends today i will tell you how to make an automatic street light using LM555 timer ic. The material required are as follows:- 
:An LM555 ic
:A 50 Kilo-Ohm Potentiometer
:An LED (white or green)
:FeCl3  Solution
:4 by 4 copper clad board.
:An LDR
:Regulated DC Power supply(+6 Volt)
:Permanent marker
:Hand drill
The circuit diagram of automatic street light is as follows:-

Made by marker


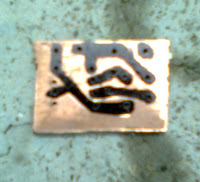
The pin no. of  IC not shown here is not in use.The adjacent picture is the pcb design of the circuit which has to be made by marker  on copper clad board.The holes on the copper clad board must be properly drilled at right place with the help of a mini hand drill.The bit used in drill must be at most .5mm dia. After marking the pcb ,it must be dipped into FeCl3  solution properly with care.Now the properly eached(cleaned) pcb is as follows:-

Here is the properly drilled PCBs. Now insert the proper terminals of a particular components in proper holes of pcb. Connect the wires with supply not more then 6volts and 500 ma.Here is the automatic street light :-

Note: positive supply is given to 8th pin no. of ic 555 and negative supply is given to 1st no. pin of the ic.
Also see the following portable model of automatic street light--
http://electronicsprojectsforfree.blogspot.com/p/blog-page.html

Here is the video:-

Friday, 12 July 2013

HOW TO MAKE A BRIDGE RECTIFIER

Hi friends today i will tell you how to make a bridge rectifier.
Here is the list of essential components required:-
:Four IN4001 diodes,
:5cm by 4 cm copper clad board(CCB),
:FeCl3 (20 grams),
:Permanent marker
:Connecting wires (insulated),
:Shouldering iron and Shoulder with flux paste,
:One 470 uf,50 volt electrolytic capacitor,
:Multimeter for Voltage testing.
First we go through the schematic diagram of bridge rectifier  as shown :-

As we can see that the diodes are connected together in a particular pattern.There are four junctions formed after connecting the diodes in which two junctions are obtained by joining like poles or terminals of the diodes while others are obtained by joining dissimilar  poles or terminals.
There are two terminals of a diode one is p-type and other is n-type. A diode is that device which allows current to flow in only one direction and blocks current in other direction.
A diode is represented as shown:
The arrowhead pointing towards a line is the cathode means it is n-type material and the tail of arrowhead is the anode i.e. p-type material .But in practical purposes a diode is in the shape of a grain seed so to identify the cathode terminal a black line is marked adjacent to the cathode terminal as shown.


Now to make PCB of the bridge rectifier we have to make the following design on the copper clad board (upper side of CCB) using a permanent marker diligently.Do not over draw the copper clad board surface.Make the holes as shown using hand drill with 1mm bit.Now to make the proper connections the excess copper i.e. unmarked copper has to be removed.


To remove excess copper a high corrosive substance FeCl3 is used.The ferric chloride solution can easily dissolve the excess copper on the PCB. So to do this the PCB is dipped into ferric chloride solution obtained by dissolving 15 grams of ferric chloride to 200ml of water.
The PCB is dipped with proper care as ferric chloride is highly corrosive substance and can harm our body skin.It is dipped for 15 minutes.
After 15 minutes we can now see that the excess copper is removed and our PCB is partially ready.With the help of water wash the PCB and with thinner remove the marker ink.
Insert the proper terminals of components in their respective holes and shoulder each terminal with copper clad board using shouldering iron and flux paste.
Here is the Bridge Rectifier:-


Note:-
Always connect negative terminal to the cathode of electrolytic capacitor otherwise it will bust. 
You can also transfer the circuit design to the PCB by using laser printer.Just print this design on a magazine paper using laser printer and put the printed  surface of paper in contact to the copper clad board and put the cloth iron on it so as to give heat.Consequently,the design is transferred to the copper clad board and the rest of the process is same as explained above.

Tuesday, 30 April 2013

HOW TO MAKE A 5 VOLT VOLTAGE REGULATOR

Hi friends today i will tell you how to make a 5-volt voltage regulator.
 ::LIST OF MATERIALS REQUIRED--
:A three terminal positive 5 volt voltage regulator ic ,i.e.,LM7805 ic
:A copper clad board (4.5cm by 6.2cm)
:Ferric chloride,FeCl 3    (!caution-highly corrosive substance) 
:Connecting wires
:Two 10uf capacitor ,One 1000uf capacitor,One 0.1uf capacitor ( all of 25volt and 85'C )
:Four Diodes IN4007
:A 0-18 step down transformer 500mA
:Shouldering iron and shoulder with flux paste. 
:Multimeter ( For measuring o/p voltage )


::PROCEDURE--
:Make the following design of copper clad board either with the help of using hand marking with the help of a black permanent marker (or nail polish) Or by printing the design on butter paper using laser printer and then transferring it to the board with the help of heating   (using iron).


:Place the marked board into the solution of 'ferric chloride' .After 20 minutes remove the board from solution and then first wash it with water and then with thinner.(Be careful !  Avoid ferric chloride direct contact to your body parts)
:Now place the component as shown in the figure and shoulder each and every terminals of component to the copper plate.
:Join the transformer Secondary coil to  where 18 v ac is written on the pcb (as shown in fig.).
:Now you can take o/p across 0.1uf capacitor which comes out to be 5 volt.
:You can easily charge your cell phone with this voltage output.